Security: Controlling Changes and Time Layer
An essential part of Sales Layer is making sure that your data is secure and that you have control over any changes that are made. Bearing in mind that there may be several users working in Sales Layer, possibly along with several input connectors performing large imports, Sales Layer allows you to keep track of any changes that get made, as well as record who made them. Furthermore, if things do go wrong, you can access a previous backup and reset your data to how it was before.
Before we continue, you should be aware that due to the demands these features imply at the server level, they are only available on Premium and Enterprise accounts.
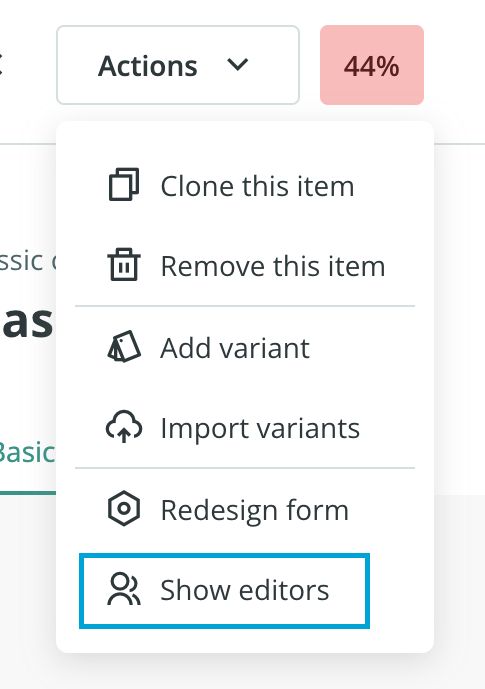
We can view changes at the individual item level by going to Actions > Show Editors. This opens a section on the left-hand side, which breaks down changes based on the time they were made. It shows which user or connector made the change as well as what was changed. From here you can also choose to recover a previous state. To hide this section, you go back to the Actions menu and click Hide Editors.

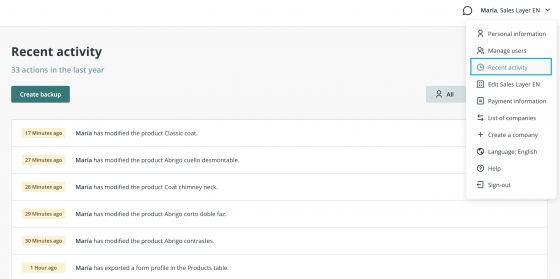
In addition to this, we can also access an activity log that displays all Recent Activity, accessible from the menu in the upper right-hand corner. This shows us a breakdown of all the activity across the account. It also allows us to create a new backup copy of the current state of our account, as well as revert to a previously made copy using

Regarding
- Sales Layer automatically generates backups after running important activities (which might compromise the product information) such as an import via Excel, unless a backup for the same day is already there.
- You can schedule automatic backups to be created daily, at a specified time.
- You can always force the system to create a new backup but there must be some changes after the previous backup.
- Time Layer stores up to a maximum of 30 backups, with each one being available for 30 days after its creation. If you try to create more than 30 then the oldest backup will be deleted to make space for it.
Note: If your project requires a backup at a certain time, please contact our support team.
Thanks to Time Layer, if you have lost important information in several products you have the option of going back to a previous moment. At this point, it is important to keep something in mind a couple of points:
- Once a backup is recovered, there will be no possibility to go back to any subsequent backup.
- It is not possible to recover the same backup twice.
- Creating a backup involves copying changes made since the last copy was generated. When a backup is recovered, the account returns to its previous state. However, if synchronization lists are configured at the image level, they are not affected. That is, if we recover a copy and at that time we did not have any list configured but now yes, these are not deleted. The images are updated based on what was available at the time, but the lists remain unchanged. This is especially important to consider if, for example, you have made changes to a connector that is connected to a website, as the configuration of the date exported might have been changed potentially causing errors.
- Bear in mind that when you generate a backup, the performance of your account may be affected until this is completed. Accounts with a large amount of data might be more affected than others.
Warning: It is not recommended to collect data after reverting to a backup copy and pass to a future backup.
Here is a tip if you need to back up your account but at the same time you do not want to lose part of your recent work.
First of all, verify when the last backup was carried out in your account by checking the last backup date in the Recent Activity section. Now, if we go back to the Products or Variants sections, we can filter the items that were created or modified starting from the last backup date. To get the list of those products, simply type one of the following examples in the search bar:
- select:modified>"16-02-2022 00:00:01"
- select:created>"16-02-2022 00:00:01"
Of course, you will have to change the date accordingly. You can now download the list of those filtered items in Excel format from Actions > Export to Excel. Here you can select the fields that you need and then click on Only the current list button to make sure we only export the previously filtered items.
This way, after backing up the account, you can import only the changes for the fields that you have selected and you do not want to lose.