Parameters
1. Credential Parameters
In the Parameters tab you must enter the API Key and the API Access Token. To check how to obtain them, review this article.
You must also specify the store name, which is the name assigned to the client’s company in Shopify.
Example: storename.myshopify.com
Then, click on the Connect with Shopify button.
If any credential data is incorrect, the following message will appear:

If the connection has been successfully established, the following pop-up window will be displayed.

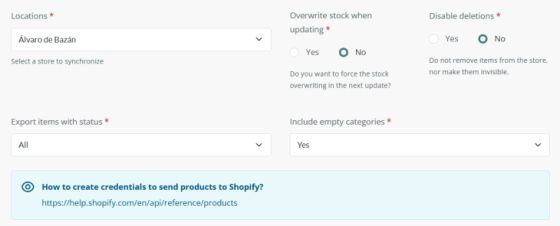
2. Location Parameter
Allows you to select the store location.
To synchronize multiple locations, you must create a separate channel for each one.
3. Overwrite Stock on Update
This option determines whether the stock quantity should be overwritten during updates.
If set to Yes, the stock will be updated in the selected location each time a product is edited in Sales Layer.
4. Disable Deletions
The No option allows the connector to execute deletions/archiving of items in the store. Otherwise (Yes), the connector will not be able to delete/archive items in the store.
Yes option:
- Requires configuring the Status field in Variants.
- Applies only when the Export items with status field is configured as:
- Visible only
- Visible and invisible
- Visible and draft
- Does NOT work when the Export items with status field is configured as All.
By applying this setting, communication between the Sales Layer API and the connector is limited in relation to deletions. This allows updating or filtering only specific items without triggering deletions or deactivations of others. For example, we can apply a filter to isolate a specific item without exporting others that do not meet the filters or deletion conditions.
Once an item is marked for update and saved in the internal table, its status will not change anymore, unless the status field is explicitly used.
No option:
- This is the default and recommended value.
- Deactivates the corresponding items.
- Deletes the corresponding variants.
5. Export Items with Status
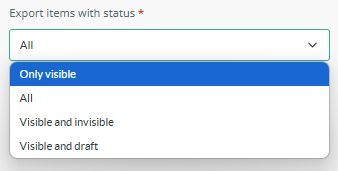
- Visible only: If the status of a group of items has changed from visible to another status, the connector will change the status of these products to archived in Shopify; if there are collections, it will remove the link to their products and their visibility in the store; and if there are variants, it will also delete them in Shopify.
- All: This option allows creating or modifying all items. In Shopify, products will be synchronized as active, collections will be sent as visible, and variants (which do not have a status in Shopify) will also be included in the synchronization regardless of their status in Sales Layer.
- Visible and invisible: If the status of a group of items has changed from visible or invisible to draft, the connector will change the item status to archived in Shopify; if there are collections, it will remove the link to their products and their visibility in the store; and if there are variants, it will also delete them in Shopify.
- Visible and draft: If the status of a group of items has changed from visible or draft to invisible, the connector will change the item status to archived in Shopify; if there are collections, it will remove the link to their products and their visibility in the store; and if there are variants, it will also delete them in Shopify.
6. Include Empty Categories
If set to Yes, the connector will include categories that do not have products.
A category is considered empty if:
- It has no products, or
- All its products have a status that is excluded according to the configured filter.
7. Language to Connect
The connector allows synchronizing more than one language per store. Languages configured in the PIM will automatically appear, allowing you to select the ones you want to synchronize with Shopify.
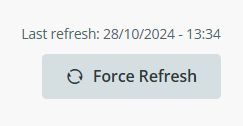
8. Force Refresh
Refreshing the connector allows resending all the information again. It should be used only in specific cases with the goal of fully restoring the catalog, never to try to speed up synchronization. On the contrary, by sending the entire catalog or forcing its sending multiple times in a row, the process will take longer than a normal synchronization.
Forcing the connector does not guarantee immediate synchronization, as it will depend on the existing process queue.
It will launch a complete synchronization, meaning it will synchronize the entire catalog, including previously synchronized items as well as newly added ones and all fields, whether modified or not, images, formulas, etc. This will significantly increase the synchronization time compared to a scheduled incremental synchronization.
Once all the parameters are configured, by clicking the Continue button in the bottom right corner, we will proceed to configure the fields in their corresponding tables. The first synchronization will automatically start after saving all the tabs.