External synchronizations allow you to automatically import images and files from an external location without having to upload them manually to Sales Layer every time assets are added or updated.
This option is particularly useful when working with a large number of images or documents, performing recurring updates, or importing a ZIP file that exceeds the manual upload limit.
When to use an external synchronization
You can use an external synchronization when:
- You need to import a large number of images or files.
- The assets are stored on an FTP server.
- You have a CSV or text file containing the asset URLs.
- You want to automatically import the contents of a Dropbox folder.
- The assets are periodically updated in the source system.
- The ZIP file you want to import exceeds the size limit for a manual upload.
The synchronization can be configured from either the Images library or the Files library, depending on the type of asset you want to import.
Before you start
Before creating the synchronization, check that:
- The images or files are available in the external location.
- The URLs provide direct access to the assets.
- The file names include their extensions, such as
.jpg,.png, or.pdf. - The paths and file names do not contain errors.
- The source system allows connections from Sales Layer.
- You have the required credentials if you are using an FTP server.
- You know how often changes should be checked.
Image and file names are case-sensitive. For example, product-001.jpg and Product-001.JPG are considered different file names.
Types of external synchronization
Sales Layer allows you to import assets using:
- A CSV or text file accessible through HTTP or HTTPS.
- A CSV or text file stored on an FTP server.
- A Dropbox folder.
For synchronizations based on a CSV or text file, the document must contain the URLs or paths of the images and files that Sales Layer should import.
Import assets using a CSV or text file
To use this method, prepare a CSV or text file with a column containing the URLs or paths of the assets.
For example:
image_url |
|---|
https://example.com/images/product-001.jpg |
https://example.com/images/product-002.jpg |
https://example.com/images/product-003.jpg |
Each URL must make it possible to identify the asset's file name and extension.
URLs without an extension or that use parameters such as &id=, &path=, or &file= may not be processed correctly because Sales Layer needs to identify the file name.
To configure the synchronization:
- Open Images or Files from the Sales Layer main menu.
- From Actions, select External sync.
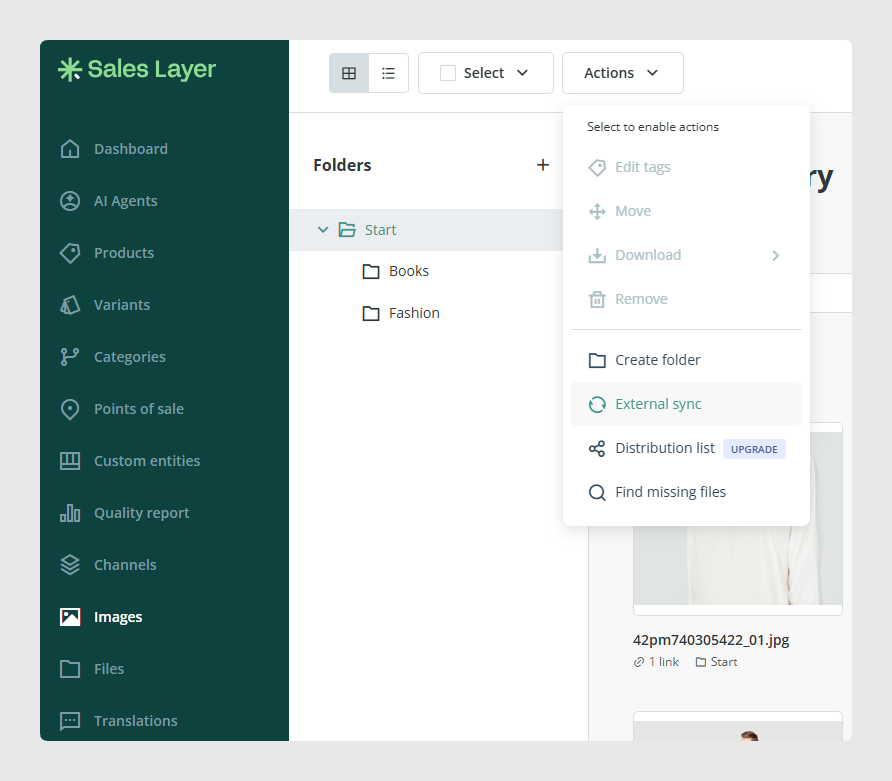
- Select the option to create an external synchronization.
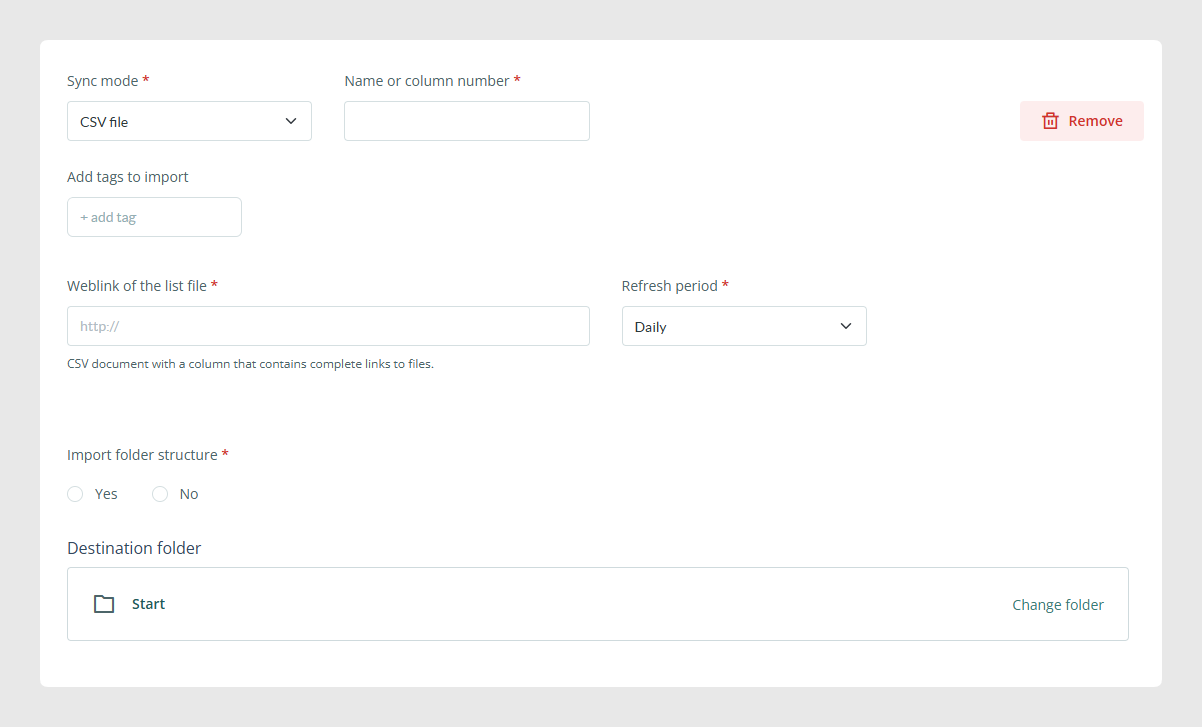
- Choose the CSV or text file synchronization option.
- Enter the address where the file is stored.
- Select the column containing the URLs or paths of the assets.
- Choose the update frequency.
- Save the configuration with Modify.
If the document contains multiple columns, you must specify which one contains the information Sales Layer should use to locate the images or files.
Import assets from an FTP server
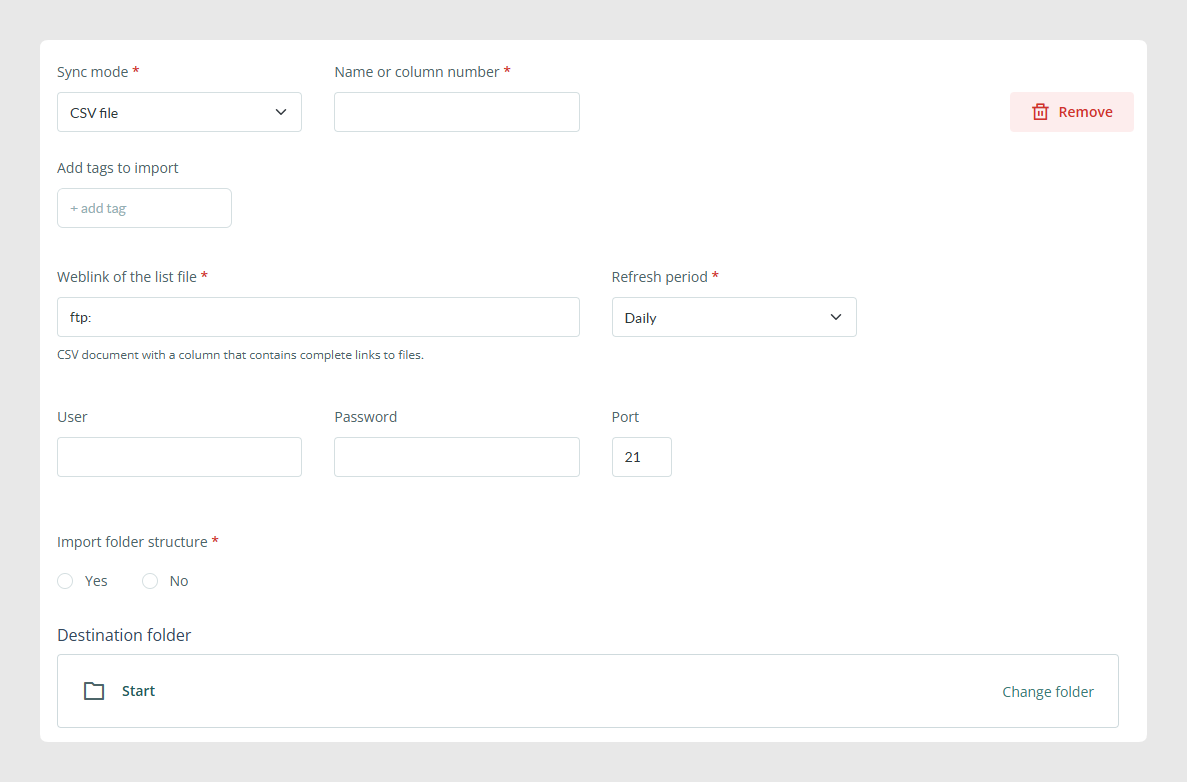
You can also store the CSV or text file on an FTP server.
When you enter an FTP address, Sales Layer will request the information required to establish the connection, such as:
- The username.
- The password.
- The port.
- The path to the CSV or text file.
The CSV can contain complete URLs or paths relative to the location of the document itself.
Sales Layer uses the directory where the CSV file is stored as the starting point.
For example, if the CSV file is stored in the SalesLayer folder and the image is located at:
SalesLayer/root/folder_1/Image01.png
The path that should appear in the CSV is:
root/folder_1/Image01.png
Do not add a slash at the beginning of the path:
- Correct:
root/folder_1/Image01.png - Incorrect:
/root/folder_1/Image01.png
The file name or path should not be enclosed in quotation marks either.
Import assets from Dropbox
You can connect Sales Layer to a Dropbox account to automatically import images or files stored in a folder.
To configure the connection:
- Open the Images or Files library.
- Select the option to create an external synchronization.
- Choose Folder on Dropbox as sync mode.
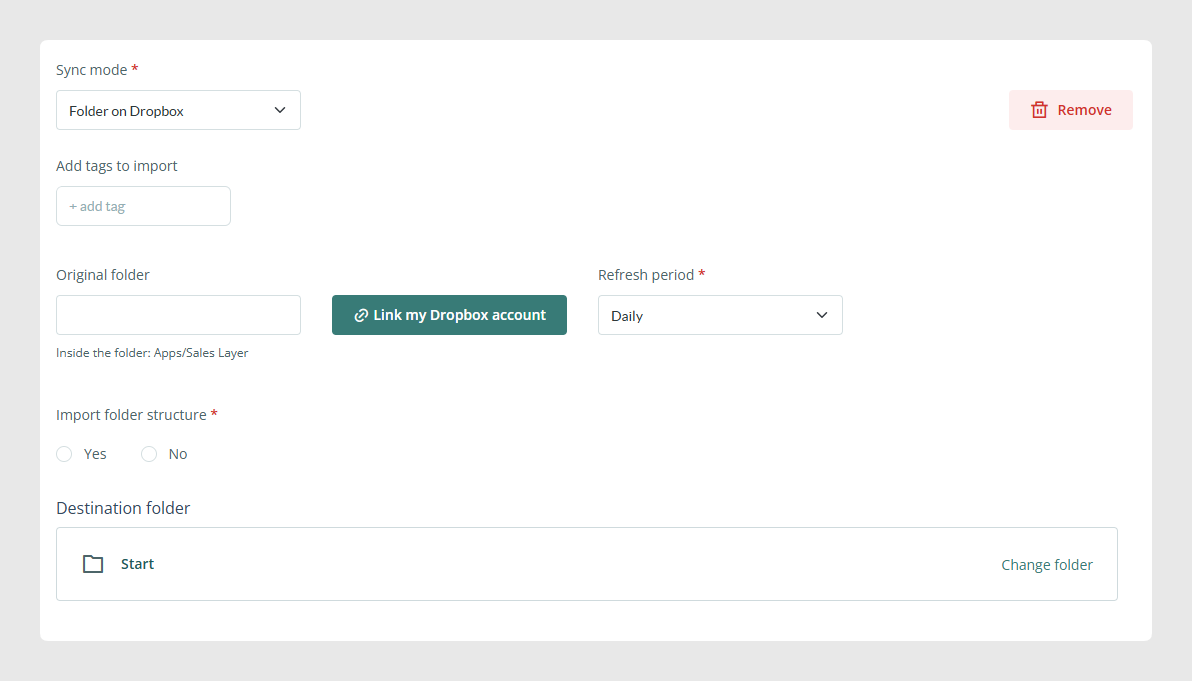
- Sign in to Dropbox by Link my Dropbox account.
- Authorize Sales Layer to access the corresponding folder.
- Select the update frequency.
- Save the configuration with Modify.
Sales Layer creates a specific location within Dropbox. Assets added to that location will be imported according to the configured frequency.
What happens when assets are deleted from Dropbox
Asset deletion works differently in Dropbox and Sales Layer.
If you delete an image or file from Dropbox, the asset is not automatically deleted from Sales Layer. This prevents an accidental deletion in Dropbox from also removing assets stored in the PIM.
If you delete an asset in Sales Layer that was previously imported from Dropbox, the asset will not be imported again during subsequent synchronizations.
To re-import all assets that have been deleted from Sales Layer, you must delete the Dropbox synchronization and create it again.
Update frequency
When configuring the synchronization, you need to choose how often Sales Layer should check the external source.
The appropriate frequency depends on:
- The number of assets.
- How frequently they are added or updated.
- The size of the images and files.
- The availability of the external server.
Updates are not immediate. Sales Layer will check the source according to the configured frequency, and processing time will depend on the number of pending assets.
Do not configure an excessively short frequency if the server constantly deletes and recreates the CSV or text file. In these cases, use a frequency that allows the document to be available and complete when Sales Layer attempts to process it.
Check imported assets
Once the synchronization has completed:
- Open the Images or Files library.
- Search for one of the assets included in the external source.
- Check that the file name and extension are correct.
- Open the asset to verify that it can be viewed or downloaded.
- Check whether the asset is linked to the corresponding products.
External synchronization uploads the assets to the library, but it does not automatically link them to products, variants, or other tables.
For the assets to appear in product information, you need to link them from the corresponding form or import their file names into an image or file field.
Troubleshoot synchronization issues
Assets are not imported from a URL
Check that:
- The URL is accessible from outside your network.
- The URL points directly to the asset.
- The file name and extension are visible in the URL.
- The website does not use external-access or hotlinking protection.
- The server does not block connections from Sales Layer.
If the server uses a firewall, you may need to allow the IP addresses used by Sales Layer.
Assets are not imported from FTP
Check that:
- The credentials are correct.
- The port is correct.
- The CSV or text file exists at the specified path.
- The document contains data.
- The selected column contains the correct paths.
- The assets are available in the specified folders.
- Relative paths do not begin with a slash.
- The file names are not enclosed in quotation marks.
Assets are not imported from Dropbox
Check that:
- The Dropbox account is still connected.
- The assets are stored in the location used by Sales Layer.
- Enough time has passed for a synchronization to run according to the configured frequency.
- The files have not previously been deleted from Sales Layer.
Remember that an asset deleted from Sales Layer is not automatically imported again by the same Dropbox synchronization.
Some images are imported and others are not
Review the differences between the files that were imported and those that were not:
- File name and extension.
- Uppercase and lowercase characters.
- Special characters.
- Folder path.
- Access permissions.
- Asset format or size.
- URL availability.
You can also try opening the URL directly in a private browser window. If it requires you to sign in or does not allow the file to be downloaded, Sales Layer will not be able to access the asset either.
Was this article helpful?
That’s Great!
Thank you for your feedback
Sorry! We couldn't be helpful
Thank you for your feedback
Feedback sent
We appreciate your effort and will try to fix the article