Connector Parameters configuration
The configuration completed in the previous section provides all the data needed to configure the Amazon SP-API connector within Sales Layer.
In this section, we will explain how to configure the connector to link properly with Amazon, as well as, all the configuration parameters.
As explained in the "important notes" section, remember that if you sell in different countries or your products belong to different product categories, it will be necessary to configure a connector per market and/or product type.
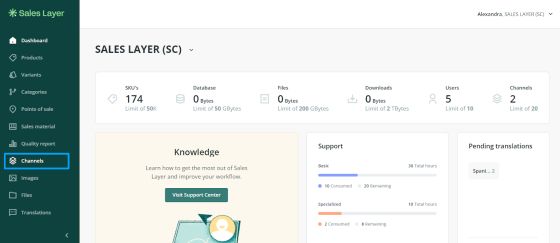
Step 1. First, you must access your Sales Layer dashboard and go to the Channels section in the left menu.
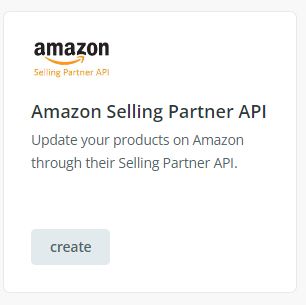
Step 2. Then, go to the "Channels marketplace" tab, and scroll down until you find the "Amazon Selling Partner API" connector, as shown in the image below.

Paso 3. Press "Create" to start configuring the channel.
Important note:
By default, a newly created connector is limited to a maximum amount of 1000 SKUs to work with. If you need to upgrade to a higher limit, please get in touch with your CSM to evaluate your case.
Next, you will have to fill in the following required fields:
- App. Client ID
- App. Client Secret
- App. Refresh Token
- Vendor Code or Merchant Code

Next, indicate the country associated with the appropriate Amazon Vendor or Seller URL. In other words, if you are exporting your products to the French marketplace, choose France.
Next, select Locale. This field indicates the language in which you want to receive field names and help descriptions from Amazon. This way, if you choose "es_ES" as your Locale, you will see "peso", and if you select "en_US", you will see "weight". These field names and descriptions will be your main help when associating Amazon fields with Sales Layer product fields and variants.

Warning: Please, note that as of February 6, 2023, you must rotate your Login with Amazon (LWA) credentials (client secrets) for all applications every 180 days. Please check our FAQs section to know how to proceed.
In the requirements parameter, you can have three different values, and each one determines a group of fields that the connector will offer, select:
- Listing is used to send product information and sales conditions.
- Listing_Product_only to send only product information. This means that data such as "price" for example would not be included in the fields offered once selecting the product type.
- Listing_offer_only indicates that the submitted data contains sales terms only. This means that information such as "description", for example, would not be included.
Depending on the option chosen, the scheme will show more or fewer fields in the output data tab once the product_type is selected.

In Applied requierements:
- ENFORCED: The scheme enforces required and conditionally required attributes (used for full payload validation).
- NOT_ENFORCED: The scheme does not enforce required and conditionally required attributes (used for partial payload validation, such as for single attributes).
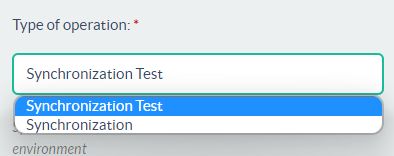
In the Synchronization Settings section, we will choose which items we want to export based on their status, and then the type of operation. The Amazon SP-API connector supports two types:
- Synchronization Test
This option sends products to an Amazon test environment. This means no changes will be made to the products in the Amazon Vendor/Seller account.
This process is useful because it allows us to test and learn how Amazon responds to the information we send. For example, this process permits you to view any product information errors, like incomplete fields or incorrect values.
- Synchronization
This process sends products to Amazon, and your changes will be reflected in the product catalog.
If the information sent for a product causes an error, no change will be made to this product in the catalog.
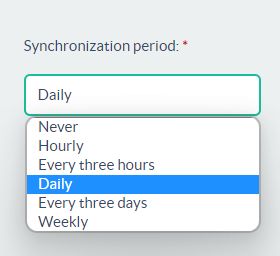
Once the type of operation has been selected, choose the synchronization period to program how often the products will be synchronized.
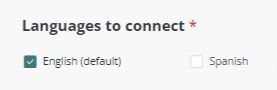
Next, choose the language(s) of the values to be sent to Amazon. The platform only accepts languages of some local variants such as es_MX, and en_US.
Tip: We recommend you talk to our Customer Success department to review your specific case.
After completing all the parameters, click on the Continue button to go to the next tab and configure the output data.