Connector Output Data Configuration
Selection of the product type
Once the connection parameters have been configured, the next step is to choose the most suitable product type from Amazon's list of product types.
Only after you choose the product type, will you see the list of Amazon fields you need to link to send your products.
Choosing the right type of product is very important. You will find a very long list of options, therefore, we recommend you use the "Product Classifier" that you will find in your Amazon account panel, or contact Amazon if you don't know what type of product to choose.
Once you have chosen the type of product, click on the Update Fields button and wait a few seconds for the list of fields to load.

Please keep in mind that:
- Amazon frequently updates the specification of its product types and can improve the help texts for each field, adding, modifying, or removing fields or their requirements.
- We recommend updating the fields to ensure that the product information meets Amazon's requirements.
- If you do not update the product type fields your products might not sync correctly.
- When updating the product type fields, you might have to review the mapping of some fields, excluding unchanged fields that remain unchanged: their mapping will be maintained.
Note: Sales Layer can help you understand how to configure product type fields within the connector, but it is the user's responsibility to be knowledgeable about the information Amazon requests for each field.
Assigning fields
As with the other Sales Layer connectors, links must be established between the fields included in the PIM forms and the target fields, in this case, Amazon fields.
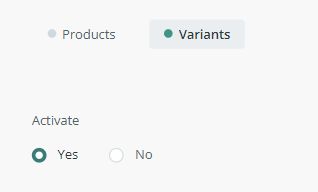
To do this, you can link Sales Layer product fields and also product variant fields if you activate them.
When linking fields, you should know that the fields marked in red are required, and the fields marked in yellow are recommended.
In addition to the required fields marked in red, new requirements may appear if there are dependencies in linked optional fields that make others necessary.
Warning: Consider that the SKU field does not accept multi-language Products or Variants. For this reason, it shouldn't be mapped with a field configured as multi-language within Sales Layer.
For example, if you link a field called "Weight", it might additionally be required to link another field called "Weight unit" indicating whether the weight is specified in "Kg" or "Grams". Alternatively, you can apply a formula to assign a value to this additional field, as in other Sales Layer connectors.
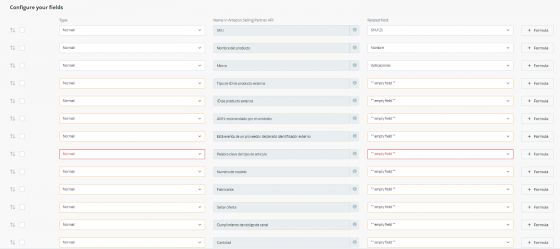
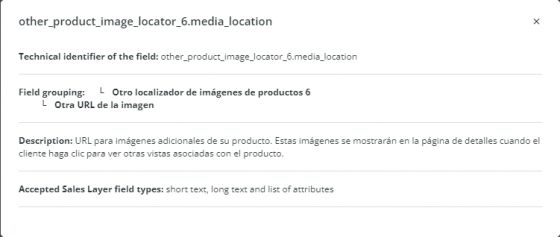
It is worth noting that we have an information button in the fields where this is necessary. This way, we know what kind of data Amazon expects to receive and what are the appropriate values to fill in.

Some fields may require specific definitions and will have to be configured in Sales Layer as table-type fields, attribute lists, and text fields... The customer should follow the recommendations indicated for each case.
Note: Remember that you can use formulas to complete the fields you need. For more information, see our Formulas section.
Variants
Amazon treats variants as a single product with their corresponding EAN and ASIN. In the PIM we have included the possibility to generate a single product, obtaining the fields based on the table they come from.
|
Product 1
|
||
|
Variant 1 color: red size: XL EAN: 1 |
Variant 2 color: blue size: null EAN: 2 |
In the configuration, the corresponding fields must be assigned. In this case, title, brand and manufacturer in PRODUCTS and color, size, and EAN in VARIANTS. This way, AMAZON will receive two products with related data from both tables. Bear in mind that, when assigning the same field in the two tables, the one for the variant will take precedence if it has a value.
Note: The tab Variants will appear in your connector only if you use variants in your account.
Images
Sales Layer has the ability to send images as URLs along with the product data we send through the Amazon Selling Partner API.
Please, note that Amazon validates all images. This means that even if you correctly map and submit images in the different formats allowed, you may not be able to see all the images included in your catalog.
In any case, by accessing the catalog on Amazon's website you can check if they were successfully processed.
Note: All images sent through the API are applied globally to each unique ASIN. That is, if the product has the same ASIN in different markets, even if in the connector we indicate the market to which we are sending the information, the images will be uploaded globally for all markets.
Although the Listings Items API does not support for the moment uploading different images per market, it is possible to do it directly from the Amazon panel.
Amazon's requirements for image submission:
- The file format must be JPG, PNG, TIFF, or GIF (preferably JPG).
- The color should be RGB or CMYK (RGB is preferred because CMYK may have color variations when displayed on the website).
- The resolution must be at least 72 pp.
- The ideal size is 1000 pixels on the longest side so that the images can be enlarged on the site. The minimum file size is 500 pixels in height or width.
Note: The first time Sales Layer submits images, Amazon sets aside the image data and submits it for listing. After successful validation, Amazon reprocesses the image data and then catalogs it. This process can take a few days.
Configuration of images
When you link the images in the Sales Layer connector, the URL of each image is sent to Amazon. You can send both the main image and up to 8 additional images (front, side, etc.) but each in separate fields.
To upload the images into the PIM you can include all of them in the same field or separately. Depending on the chosen option, the connector configuration will be different.
The main image field has to be sent through the "Main image URL" field, and in the connector it can be configured in two ways:
- Selecting "image" type in the connector and mapping it with its corresponding image type field in the form.

- Selecting "normal" type in the connector and mapping it with its corresponding link type field in the form, in the case you have directly inserted the image link.


When sending additional images, these must be sent separately through the "Other image URL" fields. You have two ways to do this:
- If you have each image loaded in the form in a different field, you can map each of them with its corresponding field following one of the ways mentioned above.

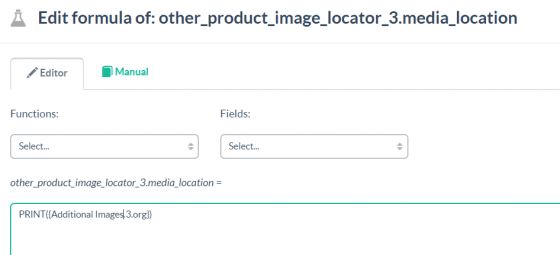
- If you have all the images in the same field, e.g. "Additional images", you can map each of them with that field by selecting "normal" type in the connector and apply a formula to indicate which one you want to send for each of them.
PRINT({Fotos.1.org})
PRINT({Fotos.2.org})
PRINT({Fotos.3.org})
Following this example, you should replace "Fotos" with the name of the field in your account where these images are located.

If all the images were loaded in the same field in the form (main and additional), the same PRINT formula could be used to indicate that in the “Main Image URL" field the first one is sent, and in the “Other Image URL" fields the corresponding image is sent.