What is the MCP Server?
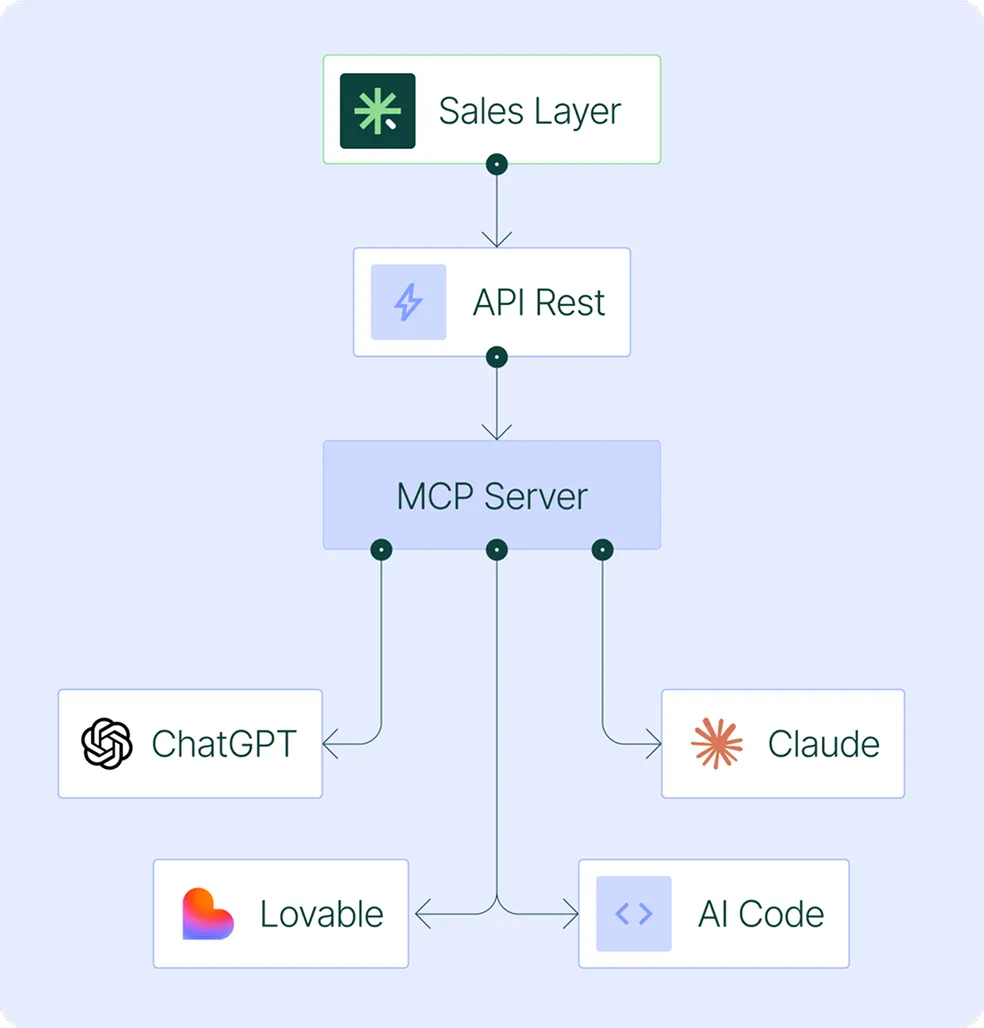
The Sales Layer MCP Server is a secure bridge between your Sales Layer product data and AI or automation tools that support the Model Context Protocol.
It allows compatible tools, such as AI assistants, IDEs, and workflow automation platforms, to query, analyze, and interact with your product catalog through a standardized connection. This helps teams build AI-powered product assistants, automated enrichment workflows, data validation processes, and intelligent search tools without creating a custom integration from scratch.
Before you start
Before connecting an AI client to the Sales Layer MCP Server, you need your Sales Layer Catalog Token.
- Log in to your Sales Layer account.
- Go to the administration area.
- Open the API/Tokens section.
- Copy your Catalog Token.
Important: Do not use the Catalog Token as a direct Authorization: Bearer token against https://mcp.saleslayer.com. For remote MCP clients, authentication must be completed through OAuth 2.0. For direct headless automations that do not require MCP tools, use the Sales Layer REST API with the X-API-KEY header.
Server URLs
The main Sales Layer MCP Server URL is:
https://mcp.saleslayer.com
Use one of the following access profiles depending on the type of connection you need:
Profile | URL | Use |
|---|---|---|
Automatic | https://mcp.saleslayer.com/mcp | The server determines the access profile based on the token. |
Read-only | https://mcp.saleslayer.com/onlyread/mcp | Only query operations are allowed. |
Full | https://mcp.saleslayer.com/full/mcp | Read and write operations are allowed. |
Authentication
The Sales Layer MCP Server uses OAuth 2.0 with PKCE. In remote clients, the Catalog Token is entered in the Sales Layer authorization window. After the token is validated, the MCP Server issues an OAuth access token for the client.
Many clients can detect the OAuth configuration automatically by using Dynamic Discovery or Dynamic Client Registration. If your client does not support automatic discovery, use the manual OAuth configuration below.
Field | Value |
|---|---|
Authorization URL | https://mcp.saleslayer.com/oauth/authorize |
Token URL | https://mcp.saleslayer.com/oauth/token |
Registration URL | https://mcp.saleslayer.com/oauth/register |
Discovery URL | https://mcp.saleslayer.com/.well-known/oauth-authorization-server |
Grant Type | authorization_code |
PKCE | Required, method S256 |
To obtain an API Key please contact Sales Layer support or your account representative, at support@saleslayer.com
Microsoft Copilot Studio
If your version of Microsoft Copilot Studio supports Dynamic Discovery, use it as the recommended configuration method.
- In Copilot Studio, go to Tools > Add tool > Model Context Protocol.
- Set the server name as Sales Layer MCP.
- Set the server description as MCP Server for PIM Sales Layer.
- Use this server URL: https://mcp.saleslayer.com/mcp.
- In Authentication, select OAuth 2.0.
- If available, select Dynamic Discovery.
- Click Create.
- When the browser window opens, enter your Sales Layer Catalog Token in the authorization screen.
If Dynamic Discovery is not available, configure OAuth manually using the values in the Authentication section of this article. The Client ID must be a stable identifier for the client, such as copilot-studio. It is not the Catalog Token.
Claude Web
- In a Claude conversation, click the tools or connectors icon.
- Select Add MCP Server or the equivalent option in your version.
- Enter this URL: https://mcp.saleslayer.com/mcp.
- Claude should detect the OAuth configuration automatically through Dynamic Client Registration.
- When the authorization window opens, enter your Sales Layer Catalog Token.
- Once connected, you can ask Claude questions about your Sales Layer product catalog.
Claude Desktop
Claude Desktop runs the MCP server locally, so it does not require OAuth for this setup.
- Open the Claude Desktop configuration file.
- On Windows, the file is located at %APPDATA%\Claude\claude_desktop_config.json.
- On macOS, the file is located at ~/Library/Application Support/Claude/claude_desktop_config.json.
- Add the following configuration.
{
  "mcpServers": {
    "sales-layer": {
      "command": "npx",
      "args": ["--yes", "@saleslayer/mcp-server@latest"],
      "env": {
        "CATALOG_TOKEN": "your_token_here"
      }
    }
  }
}- Replace your_token_here with your real Sales Layer Catalog Token.
- Restart Claude Desktop.
- To verify the connection, ask Claude: What Sales Layer tools do you have available?
ChatGPT
MCP support in ChatGPT may vary depending on the version and plan.
- Open the ChatGPT settings.
- Look for the option to add MCP Servers or External Tools.
- Add a new server with this URL: https://mcp.saleslayer.com/mcp.
- Select OAuth 2.0 as the authentication method.
- If supported, ChatGPT should detect the configuration automatically through Dynamic Client Registration.
- When the authorization window opens, enter your Sales Layer Catalog Token.
Cursor IDE
Cursor supports MCP with automatic OAuth authentication.
- Open Settings > Tools & MCP.
- Click Add new MCP server.
- Select Streamable HTTP.
- Enter this URL: https://mcp.saleslayer.com/mcp.
- Click Connect.
- When Cursor opens the browser, complete the OAuth flow by entering your Sales Layer Catalog Token.
You can also configure Cursor from the .cursor/mcp.json file in your project:
{
  "mcpServers": {
    "sales-layer": {
      "url": "https://mcp.saleslayer.com/mcp"
    }
  }
}
When the server is activated, Cursor starts the OAuth flow automatically.
VS Code with GitHub Copilot
VS Code supports MCP through GitHub Copilot in compatible versions.
- Open the Command Palette using Cmd+Shift+P on macOS or Ctrl+Shift+P on Windows.
- Run MCP: Add Server....
- Select HTTP.
- Enter this URL: https://mcp.saleslayer.com/mcp.
- Give the server a name, for example sales-layer.
- Choose whether to save the configuration in User Settings or in the current Workspace.
You can also create or edit the .vscode/mcp.json file in your project:
{
  "servers": {
    "sales-layer": {
      "type": "http",
      "url": "https://mcp.saleslayer.com/mcp"
    }
  }
}
To use the connection, open Copilot Chat and activate Agent mode. VS Code should detect the server and complete the OAuth flow automatically. Enter your Sales Layer Catalog Token when the authorization form appears.
Windsurf IDE
Windsurf supports MCP through its Cascade agent.
- Open Windsurf Settings.
- Go to Cascade > MCP Servers.
- Click Add Custom Server +.
- Add the following configuration.
{
  "mcpServers": {
    "sales-layer": {
      "serverUrl": "https://mcp.saleslayer.com/mcp"
    }
  }
}
You can also edit the Windsurf MCP configuration file directly:
- macOS: ~/.codeium/windsurf/mcp_config.json
- Windows: %APPDATA%\Codeium\windsurf\mcp_config.json
If Windsurf does not support native OAuth for remote servers, you can use the mcp-remote proxy:
{
  "mcpServers": {
    "sales-layer": {
      "command": "npx",
      "args": ["-y", "mcp-remote", "https://mcp.saleslayer.com/mcp"]
    }
  }
}
This opens the browser for authentication and manages the tokens automatically.
n8n
For n8n workflows, the recommended option is to use the MCP Client Tool or MCP Client with OAuth 2.0.
- In your workflow, use MCP Client Tool if you want to expose tools to an AI Agent.
- Use MCP Client if you want to run an MCP tool as a normal workflow step.
- Use this URL: https://mcp.saleslayer.com/mcp.
- In some n8n versions, this field may appear as SSE Endpoint or MCP Endpoint URL.
- In Authentication, select OAuth2.
- If your version supports Discovery or Dynamic Client Registration, enable it.
- If n8n asks for a Registration URL, use https://mcp.saleslayer.com/oauth/register.
- When the browser window opens, enter your Sales Layer Catalog Token.
If your n8n version does not support OAuth2 correctly with MCP, use the Sales Layer REST API directly instead of the MCP Server.
Field | Value |
|---|---|
Method | GET |
URL | https://api2.saleslayer.com/rest/Catalog/Products |
Header | X-API-KEY: your_catalog_token |
Query Parameters | $select=prod_id,prod_ref,prod_title&$top=50 |
This direct REST API option does not use the MCP protocol, so MCP tools will not be available to an AI Agent. It is useful for automation workflows that only need direct API access.
Important: A fully headless MCP integration is not available in this setup. If you need a headless integration from the start, use the Sales Layer REST API directly.
Google Gemini and other MCP clients
Before configuring Google Gemini, confirm that your version supports MCP. If it supports MCP with OAuth, add the Sales Layer MCP Server with this URL:
https://mcp.saleslayer.com/mcp
Use OAuth 2.0 with Dynamic Discovery where available, then authenticate with your Sales Layer Catalog Token.
For any other MCP-compatible client, use the same MCP URL and OAuth 2.0 configuration. If the client supports Dynamic Client Registration, let the client discover the configuration automatically. If not, use the manual OAuth values listed in the Authentication section of this article.
Troubleshooting
Error | Cause | Solution |
|---|---|---|
invalid_token | The Catalog Token is being used as a direct Bearer token, or the OAuth access token is no longer valid. | Configure the client with OAuth 2.0 and authenticate again. For headless direct integrations, use the REST API with X-API-KEY. |
401 Unauthorized in n8n | The MCP Server is being treated as a Bearer-compatible REST API. | Use MCP Client Tool or MCP Client with OAuth 2.0, or call the Sales Layer REST API directly. |
PKCE required or S256 required | The client is not sending PKCE correctly. | Make sure the client uses code_challenge_method: S256. |
Connector request failed | The OAuth configuration is incorrect. | Use Dynamic Discovery instead of manual configuration when possible. |
Authentication does not complete | A popup is blocked, or there is a redirect issue. | Allow popups for the AI client domain and try again. |
No tools available | Authentication was not completed correctly. | Disconnect and reconnect the MCP Server, making sure the OAuth flow is completed. |
Best practices
Use Dynamic Discovery or Dynamic Client Registration whenever your client supports it, as this reduces the risk of configuration errors.
Keep your Catalog Token secure and only enter it in the Sales Layer authorization screen.
Do not paste it as an API key or Bearer token in remote MCP clients.
For automation workflows that do not need MCP tools or an AI Agent, consider using the Sales Layer REST API directly with the X-API-KEY header.
Was this article helpful?
That’s Great!
Thank you for your feedback
Sorry! We couldn't be helpful
Thank you for your feedback
Feedback sent
We appreciate your effort and will try to fix the article