Example 6 - Import Into Sales Layer
Data entry and structure
Through our API and a SDK, it is possible to import data directly into Sales Layer using SalesLayer_Conn(). That means you can schedule automatic imports to the platform from, for example, a piece of ERP software.
In example 6, we will use the SDK to import information into a test account where we will update existing information and create new items.
Please note that before reading this document, it is advisable to read the documentation for our API.
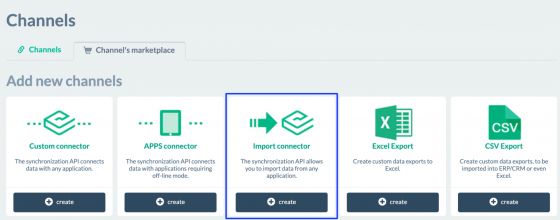
For this example, we will use an import connector. You can find it in the channels marketplace:
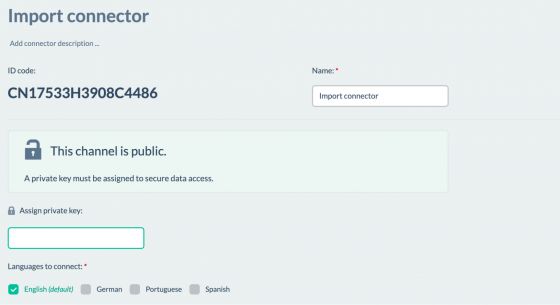
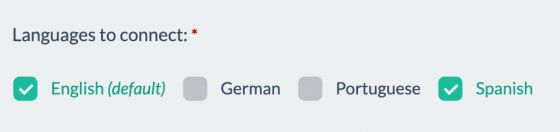
The first step will be to define a private key for the connector and choose the languages to connect:
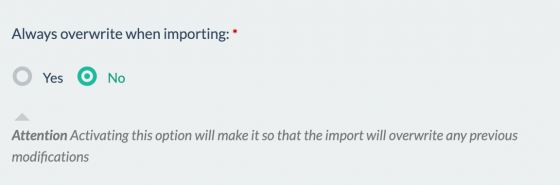
As the Always overwrite when importing parameter is used to synchronize CSV files through Linked Sources, we will not consider it in this example:
After having defined the initial parameters, we will proceed with the configuration of the tables to import. At this point, we will have to define the fields that we want to update or create (if we have new items).
Warning: In all tables, it is mandatory to upload the related field. This is because it is a mandatory field for adding new items and it is the field that recognizes the existing items to update.
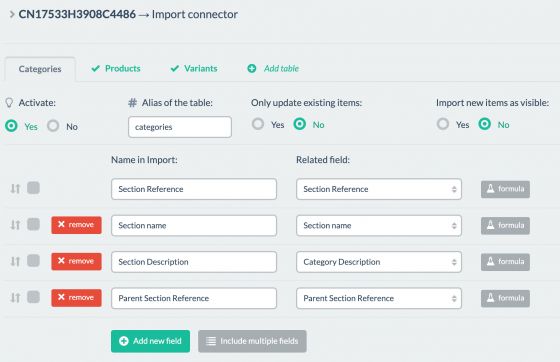
As an example, in the categories table we will add the following fields:
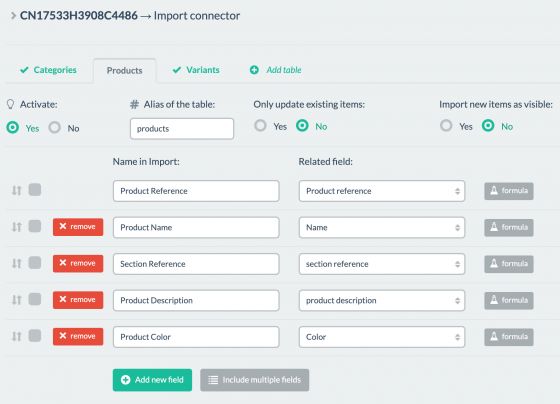
The following fields will be added to the Products table:
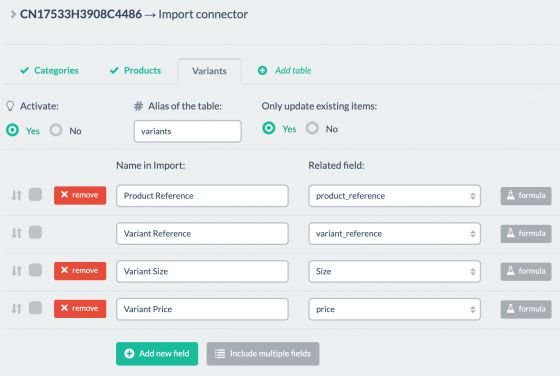
And, finally, in the Variants table, we configure the following fields:
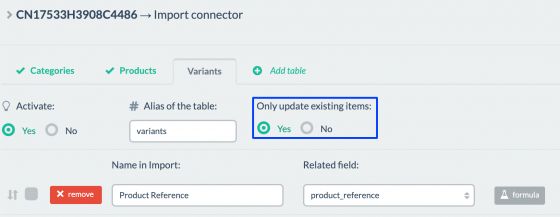
There are several things to keep in mind when setting up tables:
On the one hand, if we only want to update existing items, we should mark the checkbox with Yes.
On the other hand, if we want to not only update existing items but also create new items, we should check the Nooption. When “No” is selected, a second checkbox will appear to choose the status of new items:
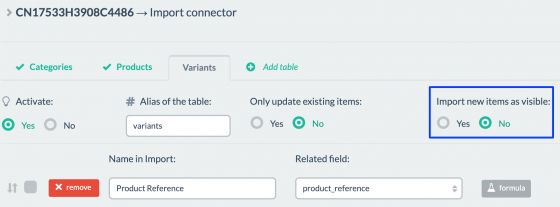
Keep in mind that, when you select that you do not want to update only the existing items, the new items will be created as a draft.
Next, you will have to decide on the name of the column to import, doing so in the column on the left:

This name has to be exactly the same as the name of the column that we are going to upload with the SDK, including spaces, hyphens, uppercase, etc.
The right column is for the related field that exists in Sales Layer:
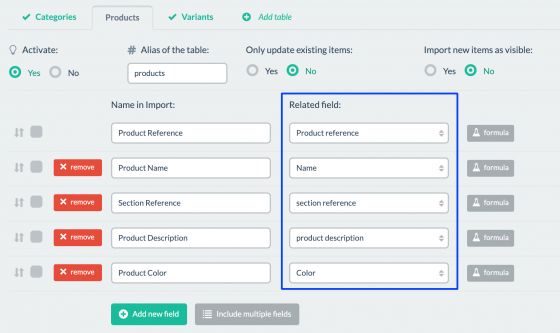
Warning: To upload information through the SDK, it is mandatory for the related field to have been previously created in Sales Layer.
Once the tables are generated and configured, we will proceed to save and completethe connector. Keep in mind that, as we are going to use our API in this case, we will not put information in the Linked Sources tab because it is used only to upload CSV files.
Code
Now, let's review what the
<?php
define('LOC_BASE', dirname(__FILE__) . '/');
require(LOC_BASE.'SalesLayer-Conn.php');
require(LOC_BASE.'lib/nice_r-master/Nicer.php');
?>
<!DOCTYPE html>
<html dir="ltr" lang="en-US">
<head>
<link rel="stylesheet" type="text/css" href="lib/nice_r-master/nice_r.css?version=<?php echo filemtime(LOC_BASE.'lib/nice_r-master/nice_r.css'); ?>"/>
<script type="text/javascript" src="lib/nice_r-master/nice_r.js?version=<?php echo filemtime(LOC_BASE.'lib/nice_r-master/nice_r.js'); ?>"></script>
</head>
<body>
<?php
//SL import connector
$connector_id = "CN17533H3908C4486";
$secret_key = "cd6a8653823248296079e595e772f9b2";
//Create object with the credentials of the connector
$SLConn = new SalesLayer_Conn ($connector_id, $secret_key);
//API Version
$SLConn->set_API_version('1.18');
//Import Data
$input_data = [
"categories" => [
[
"Section Reference" => "CHAQ01",
"Section name" => "Jackets 2022"
],
[
"Section Reference" => "CAMI03",
"Section Description" => "Summer T-shirts, Collection of 2022! The best choice..."
],
[
"Section Reference" => "SH01",
"Section name" => "Shoes",
"Section Description" => "Summer Shoes Collection. Choose the best that suits you!",
"Parent Section Reference" => "VERA01"
],
],
"products" => [
[
"Product Reference" => "42PM020100483",
"Product Description:en" => "Brown mohair coat with detachable funnel neck, raglan sleeves and concealed clip button fastening."
],
[
"Product Reference" => "AAPA10L63534",
"Product Name:en" => "Phone Cover",
"Product Name:es" => "Funda Móvil",
"Section Reference" => "ACCE02",
"Product Description:en" => "Phone cover that will protect your phone even with the strongest falls. The phone cover you need!",
"Product Description:es" => "Funda para tu movil que protegerá incluso con las caídas más fuertes. ¡La funda de que necesitas!",
"Product Color" => "Black"
],
],
"variants" => [
[
"Product Reference" => "42PM020100483",
"Variant Reference" => "FR1342",
"Variant Size" => "L",
"Variant Price" => "24.99"
],
[
"Variant Reference" => "F234944",
"Variant Price" => "49.99"
],
]
];
// set_info function
$response = $SLConn->set_info($input_data);
//error verification
if ($SLConn->has_response_error())
echo "<h4>Error:</h4>\n\n Code: ".$SLConn->get_response_error().
"<br>\nMessage: ". $SLConn->get_response_error_message();
else {
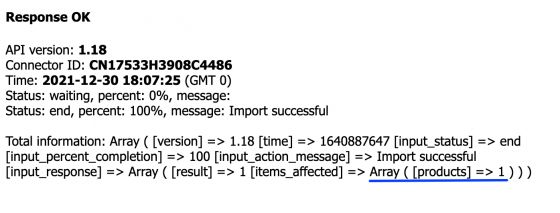
echo "<h4>Response OK</h4>\n".
"<p>".
"API version: <b>".$SLConn->get_response_api_version()."</b><br />\n".
"Connector ID: <b>". $SLConn->get_identification_code()."</b><br />\n".
"Time: <b>". $SLConn->get_response_time() ."</b> (GMT 0)<br/>\n".
"</p>";
//tracking functions
do {
$status = $SLConn->get_input_tracking_status();
echo "Status: ". $status.
', percent: '. $SLConn->get_input_tracking_percent().
'%, message: '.$SLConn->get_input_tracking_message()." <br>\n";
flush(); ob_flush(); sleep(1);
} while (!in_array($status, ['error', 'end']));
//Resume of Total Information
echo "<br />\n".
"Total information: ". print_r($SLConn->get_data_returned(), 1);
}
?>
</body>
</html>
We start by defining the credentials of the import connector, followed by the creation of the $SLConn object, responsible for the connection with Sales Layer.
Then we define the API version. In this example, we use version 1.18 because import tracking functions are available in that version, allowing us to know the percentage of imported items. Likewise, version 1.17 is still available for use.
Once that is done, it is time to configure the information we want to upload, both to create new information and to update the existing information. The structure of
$input_data = [
"table" => [
[
"reference" => "",
"campo1" => "",
"campo2" => "",
…
],
…
],
…
];
Following the example of the previous structure, we will have the code displayed below for the Category table:
"categories" => [
[
"Section Reference" => "CHAQ01",
"Section name" => "Jackets 2022"
],
[
"Section Reference" => "CAMI03",
"Section Description" => "Summer T-shirts, Collection of 2022! The best choice..."
],
[
"Section Reference" => "SH01",
"Section name" => "Shoes",
"Section Description" => "Summer Shoes Collection. Choose the best that suits you!",
"Parent Section Reference" => "VERA01"
],
]
In the first two records of the table, we will be modifying reference categories CHAQ01 and CAMI03, and in the third record, we will be creating a new record and defining all the fields configured in the connector. It is important to note here that it is not mandatory to upload all the fields of the category when creating a new item.
As we can see in this example, it is possible to upload existing records to be updated and new records to be created in the same table.
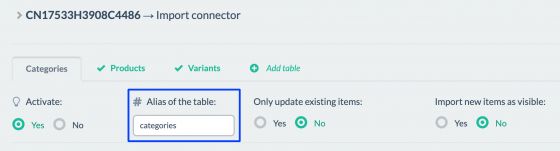
Warning: The name of the tables in the input_data structure has to be the same as the name defined in the connector in the “Alias of the Table” parameter:
As an example, in the Products table we have:
"products" => [
[
"Product Reference" => "42PM020100483",
"Product Description:en" => "Brown mohair coat with detachable funnel neck, raglan sleeves and concealed clip button fastening."
],
[
"Product Reference" => "AAPA10L63534",
"Product Name:en" => "Phone Cover",
"Product Name:es" => "Funda Móvil",
"Section Reference" => "ACCE02",
"Product Description:en" => "Phone cover that will protect your phone even with the strongest falls. The phone cover you need!",
"Product Description:es" => "Funda para tu movil que protegerá incluso con las caídas más fuertes. ¡La funda de que necesitas!",
"Product Color" => "Black"
],
]
In the first record we are updating the product description in English, and in the second we are creating a new product.
Warning: To upload information from multi-language fields, you have to define the languages to connect in the “Parameters” page.
Later, simply add the multi-language fields in the table:
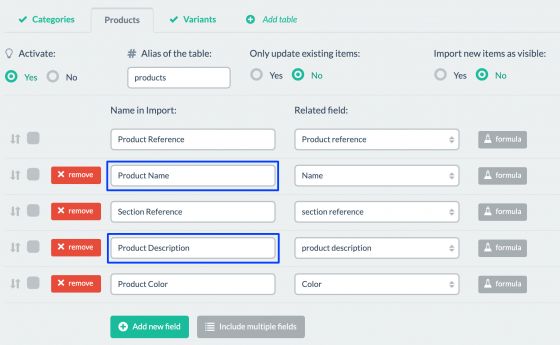
And in the input_data structure, send these fields with their respective ISO codes, Product Name:en, Product Name:es, Product Description:en, Product Description:es.
On import, Sales Layer will automatically recognize the language values with the respective fields.
In terms of variants, we have the following:
"variants" => [
[
"Product Reference" => "42PM020100483",
"Variant Reference" => "FR1342",
"Variant Size" => "L",
"Variant Price" => "24.99"
],
[
"Variant Reference" => "F234944",
"Variant Price" => "49.99"
],
],
In the first record, we see the creation of one variant and, in the second record, we find the updating of the price field for another variant.
If we continue verifying the code, we can see the call to the
After verifying that the API has not returned errors through the
- API version via the get_response_api_version() function.
- Connector ID via the get_identification_code() function.
- UNIX date of the exact time of the API call with the get_response_time() function.
And, continuing through the code, we see the following tracking functions:
- get_input_tracking_status(), displays import status.
- get_input_tracking_percent(), displays import percentage.
- get_input_tracking_message(), displays a small tracking message.
Finally, we have the display of the totals for the information uploaded to SL.
Execution and results
Upon running the
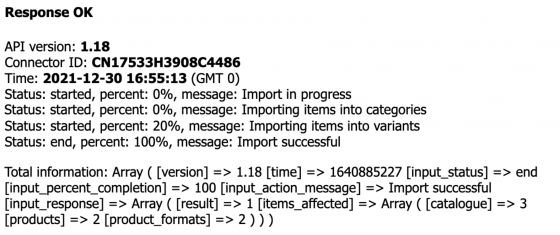
There, we will be able to check the tracking functions in

Next we will see the totals for the information imported in the different tables:

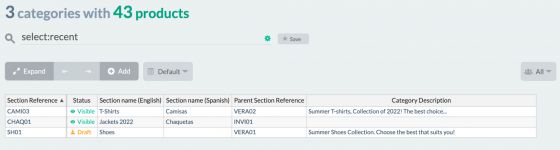
And if we look for the information in Sales Layer now, we see the following in the Categories table:
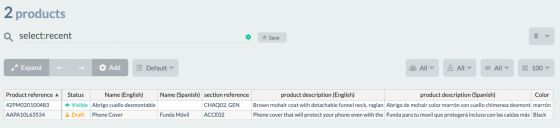
In the Products table, we have this data:
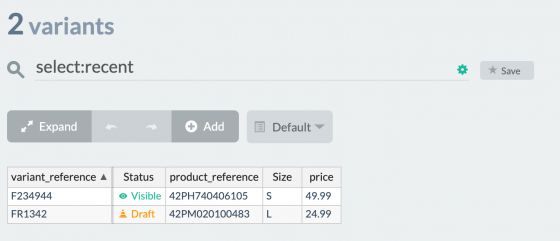
And, lastly, we have this information in the Variants table:
In addition to updating or creating information, it is possible to delete existing information. To do this, simply add the
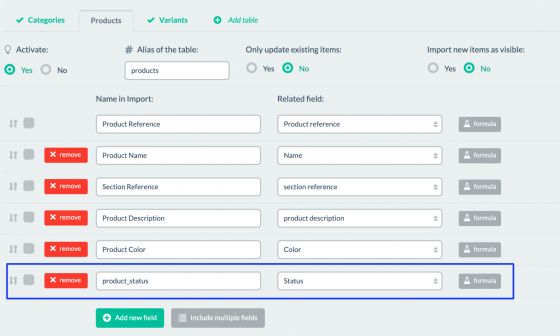
And send the value “X” in the field for the reference of the item to be deleted.
$input_data = [
"products" => [
[
"Product Reference" => "AAPA10I902516",
"product_status" => "X"
]
]
];
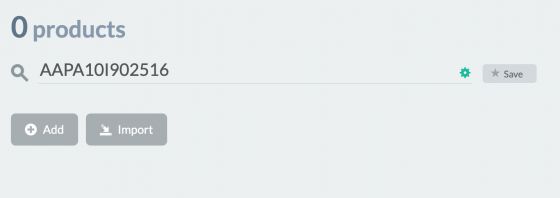
When running the code with the
And in Sales Layer, if we search for that same reference, we see that it no longer exists:
In addition, instead of using the
$input_data= [
"variants" => [
"URL" => "",
"user" => "",
"password" => "",
"port" => ""
]
];
Remember to fill in the URL, user, password, and port with the corresponding information.